metalhead
Saturn Player

Joined: January 2011
Posts: 76
Location:
|
Post by metalhead on Nov 26, 2011 0:14:13 GMT
If the LED isn't illuminating then it's likely that it's the wrong way round. I know on single colour LEDs the longest leg is the anode (positive), but on the multicoloured ones they generally share a common cathode (negative). My guess would be the long leg is this cathode and should be soldered to the ground plane (or the hole that's still got the bit of leg stuck in it) and all of the other pins are your positives.
|
|
|
|
Post by Syntesis on Nov 26, 2011 1:58:30 GMT
I just checked, you're right it is a common cathode. Switching holes I don't think would work because of the way it's been wired on the underside of the board. I think I need a new LED with common anode instead...
|
|
ameisenmann
Saturn Gamer
Joined: November 2009
Posts: 150 
Location:
|
Post by ameisenmann on Nov 26, 2011 18:50:15 GMT
You need a duo-LED with 3 legs and there is no need to stick it through one hole where the old LED was. Wolfsoft is a good totorial. I also made a tutorial because I modded a console yesterday: circuit-board.de/forum/viewtopic.php?f=54&t=5028It is in german but with help of the pics you should get the point. Maybe I translate it into (bad) english if there is enough interest... Of course you could use the ground point of the old LED on the board but I do not know if it would then fit to the desired position. This is how I did it. In the middle is ground, left and right are red and green. 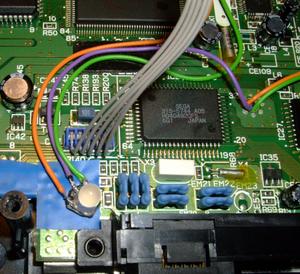 |
|
|
|
Post by Syntesis on Nov 26, 2011 19:58:19 GMT
I had to look up a few words (we never got taught German electronics vocabulary in school) but I think I got the gist. For any fellow linguists who want to learn some modding lingo:
Löstellen = solder joints
Lötlitze = braid
Lötzinn = solder
Lötkolben = soldering iron
Erdung = ground
Kontaktstellen = contact points
Kurzschlüsse = short circuits
I am using the old hole because it needs to be in that exact area anyway and I am not confident enough to really diverge from tutorials. Things are wired to the old hole on the underneath of the board too.
|
|
ameisenmann
Saturn Gamer
Joined: November 2009
Posts: 150
Location:
|
Post by ameisenmann on Nov 26, 2011 20:29:39 GMT
hey, cool enough that you learned german in school, I do not think that there are many people who do this  I can translate it as I said. Shouldn't take me more than 15min. Maybe you can correct it into good english after that. Do you have a model 1 or model 2 saturn? I think a model 2 Saturn gives you more elbowroom for placing the LED. On my board there were white lines on the board where the LED was placed. I oriented myself on these and it works ok as shown in my tutorial. I modded a model 1 once and from my experience it was not much more difficult. To hold it in place this double sided foam tape is really great. helped me a lot  I wish you good luck with your mod! Please report about your progress |
|
metalhead
Saturn Player
Joined: January 2011
Posts: 76
Location:
|
Post by metalhead on Nov 27, 2011 10:39:27 GMT
I am using the old hole because it needs to be in that exact area anyway and I am not confident enough to really diverge from tutorials. Things are wired to the old hole on the underneath of the board too. It shouldn't matter about other components sharing the same track as the old LED. Provided they are left connected then you'll be fine. As ameisenmann said above, you don't need to use the original LED points on the board. You can wire all of the LED legs to your PIC instead. |
|
|
|
Post by Syntesis on Nov 28, 2011 16:34:46 GMT
I thought I had replied but looks like my post got eaten by a server timeout.  Typically we have French, German and Spanish as foreign language options over here. I consider English, French, German and Japanese to my languages but my German is the rustiest of the lot. Hopefully one day I can polish it back up although the idea of doing German grammar again makes me shudder.  Sure, I can buff up any English passage you want to send my way. I don't have a Saturn to mod (mine is already modded). Just this Master System and a Mega Drive. And again I am using that hole because it's directly under where it needs to be to fit the casing and that point is wired to 5v. |
|


 Sure, I can buff up any English passage you want to send my way.