Metal_Sonic
 YAHOO
YAHOO
Joined: March 2008
Posts: 236
Location:
|
Post by Metal_Sonic on Jul 2, 2008 4:45:44 GMT
 Whats going on with my Saturn? all my games arent playing but theyre read as CD's. I can pick different tracks but thats it, no games work anymore. My Saturn is reading the games but as music. Help?
|
|
rossi46
 #LFGM!
Joined: June 2007
Posts: 2,769
Location:
|
Post by rossi46 on Jul 2, 2008 6:19:43 GMT
Clean the laser first
|
|
Metal_Sonic
YAHOO
Joined: March 2008
Posts: 236
Location:
|
Post by Metal_Sonic on Jul 2, 2008 7:37:24 GMT
did problem still there. Now wats funny is that with the Pro action replay, the games will play, but with a NTSC games, even though the Saturn is NTSC, the game will not play. This system was region modded with a switch by the previous owner but it no game would work as I got the same error as before. Im baffled at the moment but it might be the switch. I might have to fix it myself
|
|
|
|
Post by chizzles on Jul 2, 2008 8:04:05 GMT
Most likely the switch.
An interesting note is that some BIOS, when set to the Japanese mode, churn out a "Cartridge Unsuitable for This System" message instead!
|
|
|
|
Post by termis on Jul 2, 2008 8:05:33 GMT
There's a very, very, very high chance that 1) the wire between the motherboard & the switch is screwy/fell off/shorted somewhere, 2) or if your switch mod is a 3-country switch, then something is wrong with the IC board logic.
Do this -- If your system is a black US or a PAL unit, go in to the system setting menu (the top middle button on the CD menu), and tell me what it says on the bottom corner. There should be a lettering sequence something like this --
AAAA-B-V1.xxx
where AAAA = PAL/NTSC, and B = some single digit code.
What does it say? If yours is a 2-country (US-JP) country mod, and the part B has anything other than 1 or 4 (and I highly suspect there might be another character in its place, then the issue is indeed faulty wiring/bad mod board.
If yours is originally a JP saturn, then this sequence will not show, which makes dianostics a tad more difficult.
|
|
Metal_Sonic
YAHOO
Joined: March 2008
Posts: 236
Location:
|
Post by Metal_Sonic on Jul 2, 2008 9:31:37 GMT
Haha funny thing about the switch, its replaces the cover for the expansion port so when I removed it, wires came off the switch. So im stuck with a switch, some wires, and no clue what im doing. The wires are marked though. the wires are marked JP-6, JP-7, JP-10, JP-11 JP-11. Some have L and R written on the mark. Its a US Saturn and a JAP/US switch. Ill take some pics if necessary.
|
|
|
|
Post by termis on Jul 3, 2008 0:57:31 GMT
I started to go with explaining the wire positions, but forget that -- let's do it the easier way. Go ahead and take some pics, and label the wires in the jpeg if you can so we can see which wires are connected to what.
Then it's likely I (or others here) can tell you what wires go where. You'll most likely have to get a hold of a soldering iron to solder them back on, though you *may* temporarily be able to get it to work by taping the wires back on with some black tape (but that's pretty much guaranteed to come lose with the slightest jiggle later on).
|
|
mick_aka
 Kickin' it lively!
"Mick is moderately adequate."
Kickin' it lively!
"Mick is moderately adequate."
Joined: April 2007
Posts: 9,817
Location:
XBL: mickloaf
PSN: mickloaf
Nintendo ID: segamick
|
Post by mick_aka on Jul 3, 2008 8:12:30 GMT
What termis said  |
|
Metal_Sonic
YAHOO
Joined: March 2008
Posts: 236
Location:
|
Post by Metal_Sonic on Jul 3, 2008 9:07:30 GMT
Couldnt find the best pics so I said ***k it, put them all. Ignore my sexy knee please. Oh and I know 1 wire is missing......2 actually, shortly after reassembling, a wire was lost. The rest are in pretty bad shape and I dont know what that yellowish staining is on the board, didnt notice while I was snapping some shots. s254.photobucket.com/albums/hh115/XiXVenomXiX/ |
|
|
|
Post by chizzles on Jul 3, 2008 10:26:11 GMT
MetalSonic, your album is set to private, only you can view your pictures.
If this switch has those loops in the pins you can tie the wire around you might not need to solder it, although if the previous modder has soldered the wires in the holes to pass the wire through are most likely filled.
|
|
Metal_Sonic
YAHOO
Joined: March 2008
Posts: 236
Location:
|
Post by Metal_Sonic on Jul 3, 2008 13:07:52 GMT
Sorry about that Chow, its public now.
|
|
|
|
Post by termis on Jul 4, 2008 1:00:53 GMT
Make sure that one lost wire isn't hanging around somewhere inside the case -- that's sure to short something and screw things up. Anyway, I labeled what wire should go where on the switch. As you said, there's one missing wire, so you'll have to solder this one on the yellow spot I labeled on the pic.  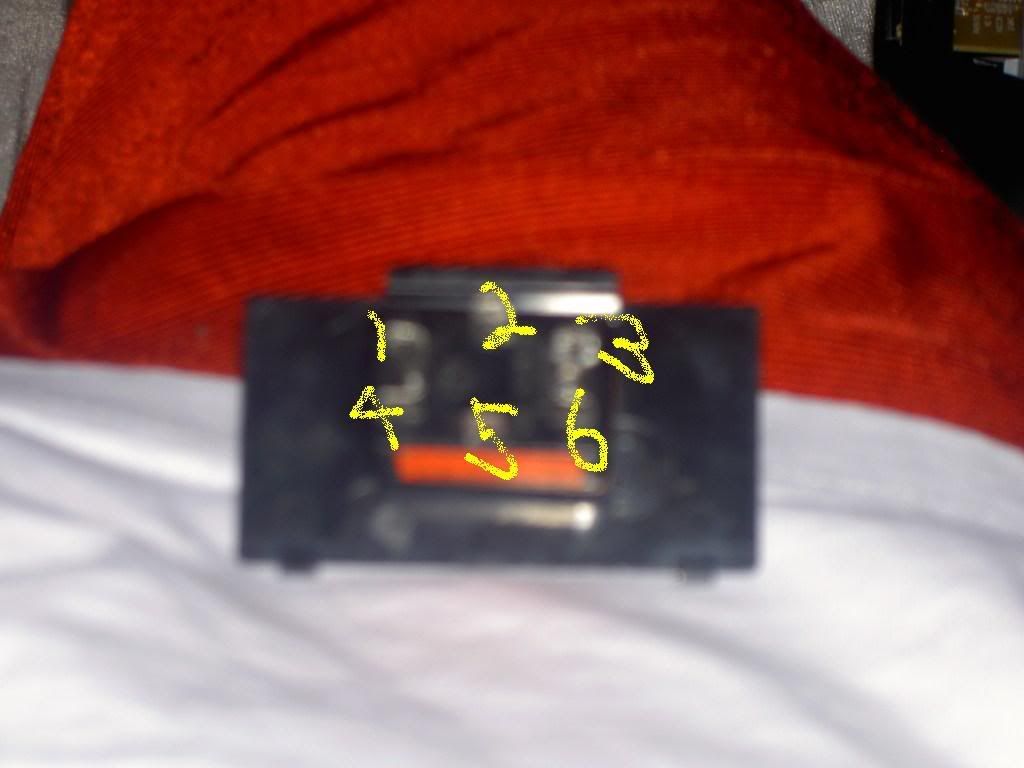 Make sure to apply some electrical tape to the wires on the motherboard side, both on the soldered connection, and also tape the wire once or twice to the motherboard itself. That'll help it from staying on the spot when being pulled on (a single solder blob sometimes isn't strong enough). I'd also advise that you solder the connection to the switch itself. Good luck! |
|
Metal_Sonic
YAHOO
Joined: March 2008
Posts: 236
Location:
|
Post by Metal_Sonic on Jul 4, 2008 2:49:02 GMT
All right, ill try my best not to f it up.
|
|
Metal_Sonic
YAHOO
Joined: March 2008
Posts: 236
Location:
|
Post by Metal_Sonic on Jul 6, 2008 5:31:52 GMT
Hey is there any special kind of wire that I need or anything else. I know someone who has lots of experience with this kind of thing but Im suppose to bring whats needed. What do I need?
|
|
mick_aka
Kickin' it lively!
"Mick is moderately adequate."
Joined: April 2007
Posts: 9,817
Location:
XBL: mickloaf
PSN: mickloaf
Nintendo ID: segamick
|
Post by mick_aka on Jul 6, 2008 10:25:11 GMT
I would assume this person has a soldering iron and some solder! other than than there should be nothing you need.
|
|